
Finally I am able to ...... and dare I be so bold as to say happy to ..........report back on the Saga of the Jeep... <Loud Dramatic Music>
On Thursday 18th August 2016 the Jeep was finally working and I could take delivery of her, This was 1 year, 5 months, 6 days to have it overhauled.
By no means was this all at the same place and does not in any way reflect negatively on the second mechanic , as you will read in previous blog entries - Jeep reborn and Storage Wars and The ongoing saga of the Jeep - Caveat Emptor - I had to take the Jeep to another mechanic to be able to have it made driveable.
The engine had to be stripped down completely, tested cleaned, valves and pushrods replaced, and then finally rebuilt.
The petrol tanks had to be taken for cleaning and repairing - paid for originally and not done.
The main rear tank, the one of hemorrhaging petrol all over my company basement floor fame, which incidentally was supposed to have been "fixed" by the original mechanic was so badly damaged it had to be scrapped - a new one will have to be imported and fitted sometime in the future.
The secondary spare tank fortunately could be cleaned and repaired.
For the vinyl doors that are coming apart at the seams a tad, I will just get down with some glue and do a bit of cosmetic repairs.
The "NEW" battery that was installed in the originally job also proved to be a dud and had to be replaced, the battery guy I went to commented that he did not think it was a new battery, but that is just an assumption, what wasn't an assumption however was I had to buy a new one.
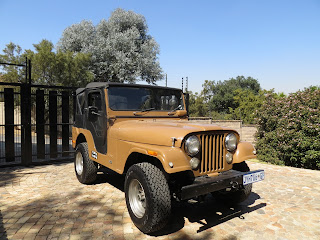
The second mechanic that worked on the jeep I have to say did a fantastic and job on it, the Jeep sounds and feels great.
Below are two pics of the Jeep now standing in my driveway.

<Music fades away>
On Thursday 18th August 2016 the Jeep was finally working and I could take delivery of her, This was 1 year, 5 months, 6 days to have it overhauled.
By no means was this all at the same place and does not in any way reflect negatively on the second mechanic , as you will read in previous blog entries - Jeep reborn and Storage Wars and The ongoing saga of the Jeep - Caveat Emptor - I had to take the Jeep to another mechanic to be able to have it made driveable.
The engine had to be stripped down completely, tested cleaned, valves and pushrods replaced, and then finally rebuilt.
The petrol tanks had to be taken for cleaning and repairing - paid for originally and not done.
The main rear tank, the one of hemorrhaging petrol all over my company basement floor fame, which incidentally was supposed to have been "fixed" by the original mechanic was so badly damaged it had to be scrapped - a new one will have to be imported and fitted sometime in the future.
The secondary spare tank fortunately could be cleaned and repaired.
For the vinyl doors that are coming apart at the seams a tad, I will just get down with some glue and do a bit of cosmetic repairs.
The "NEW" battery that was installed in the originally job also proved to be a dud and had to be replaced, the battery guy I went to commented that he did not think it was a new battery, but that is just an assumption, what wasn't an assumption however was I had to buy a new one.
The second mechanic that worked on the jeep I have to say did a fantastic and job on it, the Jeep sounds and feels great.
Below are two pics of the Jeep now standing in my driveway.


<Music fades away>
The End


